Friday, 23 November 2012

digipak continuation

I had an array of different photographs from the video shoot that I liked, and firstly tried to create the digipak on an online template, but that wouldnt save and had to infact be copyrighted as possesion of the website, so I decided to copy a template into photoshop and work over that. All the different colours didnt mix together well so I decided to only use photographs from the beach scene.


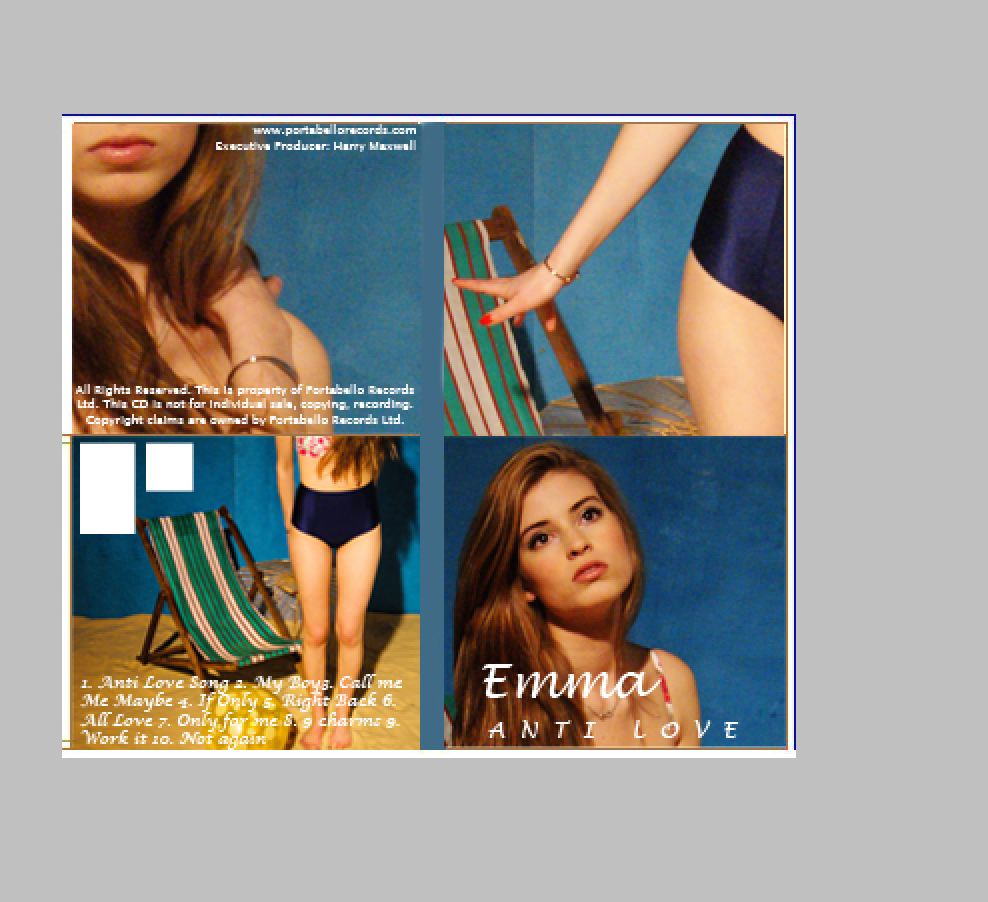
I firstly put in all the final beach photographs and saw how they looked together. All the different photos made the digipak look to ameture and it wasnt interesting enough. With the help of Phil's brain, I decided to have interesting angled shots of only sections of her in each cover of the digipak. A 4 panel digipak also worked out to be more effective. As you can see below I started to crop the photos of her in interesting and different ways. I really liked the effect that this gave the digipak as it made every page quite mysterious and insteresting, which is how we want to portray our artist.

Upon hearing feedback on the digipak prototype above the audience said the text needed to change and the front cover blue background was different to the rest. These were things I had to change. Below you can see my progression. I tried out different texts that were clearer yet still girly. I then cropped round Emmas face on the frount cover, and deleted the background. I copied a section of color from the other backgrounds and them pasted Emmas face ontop to creat the right color background.


I also tried to test whether the digipak would look better in black and white, but it turned out that we want Emma to be portrayed as fun, flirty and excited also, and the colours in the beach photographs enhanced her fun personality.
 
For my final digipak I changed the text and background colours, changed the song names and album name, and I also have to add the barcode and production logo. I looked at other digipaks like Kelly Rowland and Jo Birchall to see their production companies and the copyright details the have to put on the digipak.


continuing with digipak

 The digipak has proven to be harder than I thought. I looked through font types online as our computers didnt have the ones I was looking for. We wanted a sexy and girly font so I was looking for a curly type of writing that was girly and pretty but not too childish. I found a couple and tested them out on 'dafont.com'. I tried to insert these font onto a photograph of emma in paint but for some reason it didnt come out the way I wanted it so I decided to switch to photoshop and try and work out these issues on there.


Monday, 19 November 2012

Starting the digipak designs


In todays lesson I went up to the editing suite to get inspiration from the digipaks they keep there in order to start creating my own. Whilst I was doing this, Layla had started the editing process;


I firstly went through all the photographs I had taken of Emma purposely to use in our digipak. I also went on line and looked up the digipak template measurements so I could start cropping and sizing the images. I then took a piece of paper and drew up a diagram of a 4 panel digipak and what writing and credits had to go where. I then chose which photographs would look good together and printed them out so I could have a mini-digipak prototype. After looking at this I had to go online and see what technical credits I had to put on like 'producer' etc. Photoshop will be my main workspace to create this digipak as it allows you to move anything you want and create new designs. I also study photography and have learnt all about photoshop so I will be able to use the more complex tools and filters in order to get the best results. I thought about what other kind of songs our artist would sing about and came up with 12 titles of songs that relate to her and her genre, so the digipak is more legitimate.


Tuesday, 13 November 2012

digipak exploration

I looked online and found templates of digipaks. There were 2 templates that stuck out to me as ones I would want to use. As we want the brand of the artist to be all about her, and our music video emphasises this as she is the direct focus, I want the digipak to be the same. The digipak with have all photographs of herself. Possibly with some men in the background, but no other girls. I want to possibly include a leaflet in the front cover that you can remove from the digipak. This will include more photographs of the artist and lyrics of the songs on the album. I may also have credits to the producers and company etc.
I have taken the photographs and uploaded them onto my lightroom account and catalog. I have gone through some of them and edited the ones I liked to make them perfect for the digipak. I then exported the photos I had so far and trasported them to me hard drive, and then copied them onto my school media photoshoot account. 
I then wanted to make a mini digipak prototype and pasted the photos I could use in with the template. I will definatly take some studio shots of Emma but have to first plan what photographs will go where.

I then pasted the digipak template into word, as these computers didn't have an easy editing software and I am just making a brief template to show the group. I put the sort of photos I thought should be in each place in their sections and printed it out to make another mini pak. I quite like the look of the digipak, but it needs a lot of work. I need to think about text fonts and colour schemes of the album.

 My finished product is just underneath. There is my first template of my digipak. I will show the gorup in our next production meeting and see if they have any good advice or ideas for the digipak. I will also take in any preferences they have for the artwork or font.

Monday, 12 November 2012

Photos on set

I was not only in charge of taking continuity photographs throughout the shoot, which we needed to make sure everything was in the same place throughtout the shoot. I also was concentrating of taking stills from each shoot that we could possibly put on our merchandise, digipak and other ancillary products e.g the website. I took a lot of photographs and some of them came out very nicely. So far I am still in the middle of post editing all of them and picking the right ones. We want these photographs to be sexy and fun, giving off the right message to our target audience and we also want our star to look desirable. Here are some of the photographs I took and have edited;


Wednesday, 7 November 2012

Exploring the Digipak

We had a production meeting at the beginning of this lesson to allocate everyone roles in post production. Layla had alreay started editing our footage so we decided she should continue as she knows the most about the editing software. Sarah and Chuffy are going to start the website and I am going to design the digipak, this is useful as I was also taking stills of each set and Emma during the whole shoot, so I have material to work with. I looked into other artists digipaks and here are some of the ones I found.

                                 
I looked at Lilly allen's digipack as she relates to our artist. The both represtent the same kind of genre and we are ultimatley trying to send of the same messages to our target audience as Lily Allen does. These messages are that she is fun, flirty and appealing to everyone. Lily Allen's digipak is very colourful, which I will try and incorpoirate in ours. Colour sends out a happy vibe to audiences and it makes a digipak more welcoming and appealing.
I looked up some other digipaks just to get a better knologe of the layout so I could fully understand what I was making. I need to make and album cover, a backing cover, and 3 inside layers that show song lists and titles. I also need to think of a logo for the artist, and what her artist name will be. When I talk to the group about the artist name, we will have to think about album name and the type of font and layout we are imagining.

Tuesday, 6 November 2012

Shoot Day evaluation

Our shoot was taking place on a Monday, and as school ended at 4 30 on Friday, we only had an hour to prepare our set before the day. We helped the previous group pack up and clean the studio before we brought in our own props. As we were building 3 sets, there was a lot of heavy lifting and building, so we needed all the help we could get. We had finished all of our props lists, casting contact sheets and set list for the day. So we all knew exactly what our plans were for the real day, so everything would run smoothly. We got the basic walls into the studio and propped them up so they could stand on their own. We also had the cafe flooring down.
The morning of the shoot day I was nervous for the shoot and knew that there was a long day ahead of me. I packed all the props that I was supplying the night before, and put it in a bag next to my door so I would not forget to bring it, or it would have cause problems and set us back. I was excited to finally film everything we had planned, and create our very own music video. I was very nervous and worried about whether we would finish tall of our shots in time and whether the set would be interesting and as I imagined it.
I think we were all very well prepared for the shoot. We had our props list of all the different things we had to get separately and I supplied everything I was asked to. I supplied fur jackets, and pieces of clothing etc, but I also brought additional things I thought would look good like bows, nail polish, make up and accessories.
When we had finally finished setting everything up, attaching roses to the walls, blowing up balloons, setting up the dressing room with tables, mirrors, frame photographs etc I was very please at how the set looked. The first photoshoot was full of balloons, flowers and petals. It looked very girly and fun, and we set up the camera equipment in the shoot also so it ended up looking like a real photoshoot set through the video camera's eyes.

Saturday, 3 November 2012

Night before our shoot

Our shoot was on Monday so we only had an hour in the studio the prior Friday to set up for our set. The group before us unfortunatly was using very messy props and spreading glitter and confetti all over the studio. As we were very keen to get the studio clean and start preparing for our own set, we were more than happy to help the group before us clean up. We must have been doing a very good job as the group before us soon dissapeared and we were left to clear up their mess.
We were hoovering the floor for a while desperatly trying to get the floor clean enough to start building our three walls and rooms. Luckily, many hands make little work, and we were on track with a clean studio soon after we arrived.   

By the end of the day we had the plain white boarders of each room in our video so we were completely ready to fill the sets Monday morning bright and early when we arrived in school.


Thursday, 1 November 2012

Painting the set

A big job that Sarah and I had was painting our beach backdrop. Dan, our set desginer, provided us with 2 large rectangle panels that would be put together and provide our beach backdrop. We had to paint the whole boards white first, and then mix the blue to find a suibtable sky colour. There was a lot of trouble with finding the paint, the rollers and the handles. We had to search back and fourth from the theatre deparment who said media had it, back to the media deparetment who said theatre had it. Reflecting on this we probably should have pre prared all the things we needed as we spent a lot of our time trying to get everything together, and the painting took longer than we expected.
We waited for the blue boards to dry and then tried to paint the yellow sun on. The sun was turning green and we countlessly put on more coats of yellow trying to stop it from going green. Sarah then had a revaltion to cut out a circle, paint it yellow, and then stick it onto the background. I dont know why we didnt think of it before but it worked out to look very good.

(Picture of beach set)